Fit Food(ie)

Fit Food(ie)
Fit Food(ie)

Fit Life

Fit Life
Fit Life

Fit Work

Fit Work
Fit Work

Pumpkin Spice Crumb Cake

This crumb cake is gluten free, dairy free, and sugar free! It goes perfectly for a fall breakfast along with a 37 calorie Pumpkin Spice Latte.

INGREDIENTS

Cake
½ cup almond flour
½ cup coconut flour
⅓ cup Swerve
3 tablespoons ground flax
2 teaspoons pumpkin pie spice
1 teaspoon baking powder
4 eggs
⅓ cup canned pumpkin
¼ cup non-dairy milk
2 tablespoons melted butter
1 teaspoon vanilla extract

Crumb Topping
2 tablespoons melted butter
⅓ cup almond flour
¼ cup chopped pecans
3 tablespoons Swerve
½ teaspoon cinnamon
Pinch sea salt

DIRECTIONS

Heat oven to 350°F. Whisk together the dry ingredients (almond flour through baking powder) in a bowl. In a separate large bowl, whisk the eggs, pumpkin, milk, butter, and vanilla. Add dry ingredients to wet and stir to combine.

Add batter to an 8-by-8-inch dish coated with cooking spray. Stir together the crumb topping ingredients. Sprinkle over the top, and bake for 30-32 minutes on a middle rack until set and the top is golden brown. Let cool before cutting into 9 squares.

Want more indulgent, healthy recipes that fit in your nutritious food plan and support in your health and fitness journey? Interested in accountability to reach your health goals? Fill out the application for more info!

Fill out my online form.
HTML Forms powered by Wufoo.
0

Spaghetti Squash Lasagna

Spaghetti Squash, dinner recipe, keto, gluten free, 21 Day Fix, 2B Mindset, Clean eating, Autumn Calabrese, Tosca Reno, Vanessa.fitness, vanessadotfitness, vanessa mclaughlin, vanessa.fit
This sinfully delicious Spaghetti Squash Lasagna is made with all-natural marinara, ricotta cheese, grated Parmesan cheese, and healthy spaghetti squash.

Prep Time 15 mins

Cook Time 1 hr 17 mins

Servings 4

INGREDIENTS 
1 small spaghetti squash (approx. 3½ to 4 lbs.)
Nonstick cooking spray
4 cups all-natural marinara sauce (no sugar added)
3 cups ricotta cheese
1 cup grated Parmesan cheese
2 cups ground meat of choice (beef, chicken, turkey)
1 cup mushrooms
1 cup chopped onions
¼ cup finely chopped fresh basil (optional)

INSTRUCTIONS
  1. Preheat oven to 375° F.
  2. Line large baking sheet with parchment paper. Set aside.
  3. Cut spaghetti squash in half lengthwise. Remove seeds and membrane.
  4. Place spaghetti squash, cut side down, on baking sheet. Bake for 40 to 45 minutes, or until tender. I like to drain it so its not so watery after baking. (You can also use the microwave or Instant Pot to cook the spaghetti squash).
  5. Reduce oven temperature to 350º F.
  6. Scrape spaghetti squash flesh into stringy noodles.
  7. Lightly coat 4-quart baking dish with spray.
  8. Evenly layer half spaghetti squash, half marinara sauce, and half ricotta cheese in baking dish. Repeat with second layer.
  9. Evenly top with Parmesan cheese.
  10. Bake for 30 to 32 minutes, or until golden brown and bubbly.
  11. Garnish with basil (if desired)
Want more recipes like this, or support in your health and fitness journey in one of my Fit Clubs? Complete the form below and I'll send you info within 24 hours!
Fill out my online form.
There are tons of Wufoo features to help make your forms awesome.
0

Calling all Pumpkin Spice lovers!!

Pumpkin Spice, Fall, Shakeology, Autumn Calabrese, Tosca Reno, Clean Eating, Ilana Muhlstein, vanessa.fitness, vanessa.fit, vanessadotfitness, vanessa mclaughlin, 21 Day Fix, 2B Mindset,
Pumpkin Spice lovers: You asked, they listened! Look what's coming soon!!! Pumpkin Spice Vegan Shakeology! If you're like me, come fall, I love Pumpkin Spice EVERYTHING!! Each fall I would create my own Pumpkin Spike Shakeology, but I needed quite a few ingredients, and would always race to finish the can of pureed pumpkin before it spoiled.
Now, I can whip it up quickly, without any wasted pumpkin!!!

WHAT IS PUMPKIN SPICE VEGAN SHAKEOLOGY?

Pumpkin Spice Vegan Shakeology is a limited edition, rich, creamy, shake with notes of pumpkin, cinnamon, nutmeg and ginger that delivers the delicious taste of fall with all the benefits of Shakeology.

For a limited time only, starting September 15, 2018, customers can order Pumpkin Spice Vegan in 14 single-serve packet boxes as a one-time purchase. *There is no limit to how many customers can buy while supplies last. However, there will be no monthly subscription option as Pumpkin Spice Vegan is available only while supplies last.

Pumpkin Spice Vegan Shakeology will be available exclusively in the US in limited quantities.

Order Options
Pumpkin Spice Vegan Shakeology can be ordered as a one-time purchase only as monthly auto-ship is not an option.
However, customers may buy as many boxes as they like, while supplies last.

Product Configurations
Bag – Not available
Packets – 14 single-serve packets

Availability – Starting Fall 2018, while supplies last.

Supplement Details

Nutrition Label – US – Link coming soon! (Not available in CA or UK)

FDA Compliant – Yes

Vegan – Yes

Kosher – No.

Gluten Free – Formulated without gluten ingredients, but not certified. View article 5611

Certified Organic – No, but the possibility of a completely organic Shakeology is being researched

Certified GMO-Free – No, but it’s formulated without genetically modified ingredients

Pumpkin Spice Shakeology Pricing –$74.95 for a 14 single-serve packets box. Preferred customers get 25% off!! 

Want to be the first to know when it becomes available for purchase?
Fill out this form below and I will be in touch with more info.

0

Turnip Fries

french fries, turnips, veggies most, ilana muhlstein, vanessa mclaughlin, vanessa.fit, vanessa.fitness, vanessadotfit, autumn calabrese, tosca reno, low carb
Love, love turnip fries!! 
They are SO good!!
They stink while they cook, but there is a subtle, nutty sweetness! Probably ate too many since I ate the all of them!!! 😂😂

They are a great substitute if you're missing french fries. Also, if you're following a keto, paleo, gluten free, or just all around healthy diet, turnips are a low carb veggie, so they fit perfectly into any of these nutrition plans.

INGREDIENTS
3 pounds turnips
1 tablespoon vegetable oil
1/3 cup grated Parmesan cheese
1 teaspoon garlic salt
1 teaspoon paprika
1 teaspoon onion powder

INSTRUCTIONS
Preheat oven to 425 degrees F (220 degrees C). Line a baking sheet with a piece of aluminum foil and lightly grease.
Peel the turnips, and cut into French fry-sized sticks, about 1/3 by 4 inches. Place into a large bowl, and toss with the vegetable oil to coat. Place the Parmesan cheese, garlic salt, paprika, onion powder in a resealable plastic bag, and shake to mix. Place the oiled turnips into the bag, and shake until evenly coated with the spices. Spread out onto the prepared baking sheet.
Bake in preheated oven until the outside is crispy, and the inside is tender, about 20 minutes. Serve immediately.

Want more recipes like this, or support in your health and fitness journey in one of my Fit Clubs? Complete the form below and I'll send you info within 24 hours!
Fill out my online form.
There are tons of Wufoo features to help make your forms awesome.
0

Spinach and Ground Beef Stuffed Portobellos

mushrooms, portobello pizza, keto, gluten free, recipe, Autumn Calabrese, Tosca Reno, Ilana Muhlstein, Vanessa.fitness, vanessa.fit, vanessadotfitness, vanessadotfit, vanessa mclaughlin
I was born in Italy and raised on the Italian flavors of garlic, marinara, mozzarella, and parmesan. These staple flavors make an appearance on my meal plan each week. 
With this recipe, I took the elements of lasagna filling—ground beef, ricotta, spinach and Parmesan cheese—and nestled them into roasted portobello mushroom caps. The recipe works best with very large portobello caps; if you can only find smaller ones, buy one or two extra and divide the filling among all the caps. I served with sautéed, zucchini noodles covered with marinara and sprinkled with parmesan.
INGREDIENTS
4 large portobello mushroom caps
Cooking spray
2 cloves finely chopped garlic (I use a microplane and grate it)
1 cup  ricotta cheese (I use whole milk ricotta)
1 cup finely chopped fresh spinach
½ cup finely shredded Parmesan cheese, divided
2 tablespoons finely chopped kalamata olives
½ teaspoon dried basil (I used chopped fresh basil in the summer)
½ teaspoon dried oregano
1 cup mozzarella cheese (I used Trader Joe's Almond Milk mozzarella)
¾ cup prepared no sugar marinara sauce (I use Trader Joe's organic marinara because it has no sugar)
salt and freshly ground pepper, to taste

INSTRUCTIONS
  1. Preheat oven to 450°F. Coat a rimmed baking sheet with cooking spray.
  2. Place mushroom caps, gill-side up, on the prepared pan. Spread chopped garlic on top, and sprinkle with salt and pepper pepper to taste. Roast until tender, 20 to 25 minutes.
  3. Meanwhile, in sauté pan, place 1 TBSP evoo and cook about 1 minute, then add ground beef, 1/2 tsp basil and 1/2 tsp oregano, salt and pepper to taste. Cook until browned, and cooked through. 
  4. Add marinara sauce to ground beef mixture and keep warm. 
  5. Meanwhile, mash ricotta, spinach, ¼ cup Parmesan, olives, basil, oregano, and salt and pepper to taste  in a medium bowl. 
  6. When the mushrooms are tender, carefully pour out any liquid accumulated in the caps. Return the caps to the pan gill-side up. Spread 1 tablespoon marinara into each cap; cover the remaining sauce to keep warm. Mound a generous ⅓ cup ricotta filling into each cap and sprinkle with the remaining ¼ cup Parmesan and mozzarella cheese. 
  7. Bake until hot, about 10 minutes. Serve with the remaining marinara sauce.
** Easy cleanup: Recipes that require cooking spray can leave behind a sticky residue that can be hard to clean. To save time and keep your baking sheet looking fresh, line it with a layer of foil before you apply the cooking spray.

Want more recipes like this, or support in your health and fitness journey in one of my Fit Clubs? Complete the form below and I'll send you info within 24 hours!
Fill out my online form.
There are tons of Wufoo features to help make your forms awesome.
0

Greek Chicken Kebabs

Greek Chicken Skewers Kebabs, autumn calabrese, tosca reno, vanessa.fitness, vanessadotfitness, vanessadotfit, vanessa.fit, clean eating, keto, paleo, dinner, low carb, grilling recipe
I was looking for a grilled chicken recipe for the summertime, when I found a variation of this one. I usually find something online, then change it to meet the tastes of my family, and the ingredients I have on hand. I wanted something different than just plain grilled chicken, and this was fabulous. Everyone in my family loved it, even my picky eater son, who eats mostly peanut butter, wants me to make this again. Plus, food is just more fun on a kebab!
This is excellent served with pita bread, a garlicky tzatziki, and a Greek salad. Many variations on vegetables can be used.  
I served this over cauliflower rice, which I sautéed with chopped onion and sprinkled with some chunks of Feta cheese. 
Another plus is that as I made the kebabs, I could tailor each one to each person's taste. For example, my husband doesn't like onions, so I left the onions off his, and my older son doesn't like tomatoes, so I omitted those of his kebabs. 

INGREDIENTS
1/4 cup olive oil
1/4 cup lemon juice
1/4 cup white vinegar
2 cloves garlic, minced
1 teaspoon ground cumin
1 teaspoon dried oregano
1/2 teaspoon dried thyme
1/4 teaspoon salt
1/4 teaspoon ground black pepper
2 pounds skinless, boneless chicken thighs, cut into 1 1/2-inch pieces
2 large green or red bell peppers, cut into 1-inch pieces
1 large onion, quartered and separated into pieces
12 cherry tomatoes
12 zucchini slices (about 1 to 2 zucchini, depending on size)
8 wooden or metal skewers (I used metal)

INSTRUCTIONS
  1. Whisk the olive oil, lemon juice, vinegar, garlic, cumin, oregano, thyme, salt, and black pepper together in a large glass or ceramic bowl. Add the chicken and toss to evenly coat. Cover the bowl with plastic wrap; marinate in the refrigerator for at least 2 hours.
  2. If using wooden skewers, soak them in water for about 30 minutes before use.
  3. Preheat an outdoor grill for medium-high heat; lightly oil the grate.
  4. Remove the chicken from the marinade and shake off excess liquid. Discard the remaining marinade. Alternately thread pieces of the marinated chicken with pieces of bell pepper, onion, cherry tomatoes, and zucchini slices onto the skewers.
  5. Cook the skewers on the preheated grill, turning frequently until nicely browned on all sides, and the chicken is no longer pink in the center, about 10 minutes.
Want more recipes like this, or support in your health and fitness journey in one of my Fit Clubs? Complete the form below and I'll send you info within 24 hours!

Fill out my online form.
There are tons of Wufoo features to help make your forms awesome.
0

Lose weight happily with the UN-diet!


If you're anything like me, life REVOLVES around food. You wake up thinking about what you're going to have for dinner. And as you're eating breakfast, you're dreaming of lunch. Sound familiar?!

It's no secret that I LOVE and LIVE to eat! But that food obsession has also given me a lifetime of weight struggles. I am a former yo-yo dieter, binge eater, fad diet hopper, carb cutter, and obsessive calorie counter. Which is why I am SO excited to announce our new mindful eating program, 2B Mindset!

The principles of this program are what helped me lose weight and I'm so excited Registered Dietitian Nutritionist, Ilana Muhlstein, has created an easy to follow program for YOU to follow too! This program is going to change your life!

IF YOU ARE SOMEONE WHO:


  • Is constantly "on a diet"
  • LOVES food
  • Starts every Monday on a diet and quits by Wednesday
  • Loves late-night snacking
  • Rewards herself with food
  • Punishes herself with food
  • Loves eating out
  • Loves ordering take out
  • Hates to cook
  • Beats yourself up over eating
  • Doesn't want to exercise
  • Doesn't like to exercise
  • Loves to exercise but struggles with nutrition
  • Falls off the "diet" wagon every weekend
  • Travels often but doesn't know how to stay on track
  • Feels emotionally attached to food
  • Not sure of what to eat and how to eat it in a sensible way
  • Gets excitement from food
  • Feels overwhelmed with food choices
  • Turns to food when anxious or stressed
  • Feels isolated when trying to lose weight because you can't eat with your family or go to certain restaurants
THIS IS FOR YOU!

WHAT IS 2B MINDSET?

This program was created by Registered Dietitian Nutritionist, Ilana Muhlstein, as a practical and simple weight loss solution after years of yo-yo dieting. 2B Mindset is NOT a diet – it’s about understanding how to lose weight happily, without feeling deprived or counting calories or cutting out entire food groups. You’ve heard the phrase “abs are made in the kitchen,” right? That’s why we are focusing on food as a means of weight loss while still keeping it enjoyable!

Instead of adopting the mindset of "I can't have that food for 3 weeks because I'm on a diet," you'll be focusing on what you CAN have and saying YES to the foods you want!

HOW DOES THE PROGRAM WORK?

This is simply a more positive and sensible approach to a healthy lifestyle that allows you to shift your mindset, adopt a more positive perspective on how you see food, overcome emotional eating, and make life-long changes with results that LAST!
You’ll get recipe ideas and meal prep help, plus tips for conquering emotional eating and more. Ilana has been working on this program with Beachbody for the past 2 years along with many years of researching and testing on her own to develop this program! She has taught 10 semesters of these concepts in a weight loss seminar at UCLA and helped thousands of people lose weight in her private practice in Beverly Hills.

And after a lifetime of weight struggles and summers at "fat camp" herself, she dropped everything traditional weight loss programs teach and lost 100 lbs with her own mindful eating concepts!

THAT is why I can't wait to share them with YOU!

The program includes 41 videos, ranging from 2 to 30 minutes:
21 short videos that explain the main principles of the program
5 videos to help you overcome common challenges
15 super-simple and satisfying recipes

WHAT CAN YOU EXPECT IN THESE VIDEOS?

Ilana breaks down the core principles of the program and teaches you how to shift your mindset and implement research-based techniques that yield long-lasting results so you can ditch the diet and be happy while losing weight.
She walks you through every aisle of the grocery store to show you how to save money, read labels, plan for your week in an efficient way, and make the best decisions!
She also teaches you how to eat out, how to go to events, how to approach eating at a BBQ or party, how to order take out, how to conquer emotional eating, and more!

SUPERFOODS FOR A SUPER LIFE

An integral component of the 2B Mindset program is Shakeology, which is unlike any other shake because it's made from over 70 whole superfoods from around the world. It will replace your vitamin and probiotic, fill you up, give you natural energy (without caffeine), and tastes delish! Plus it helps your hair, skin, and nails! And it has nothing artificial! It's literally what gets me out of bed in the morning and keeps me going. And I really think it's why my sons rarely get sick (and why their nails grow like weeds and need to be cut twice a week!).

What sets it apart is that there are NO GMOs, soy, artificial colors, sweeteners, flavors, or preservatives! It's seriously delicious and improves your energy, digestion, cravings, hair, nails, and skin. The ingredients are sourced from all over the world and the Shakeology creators regularly visit the farmers to test the soil and ensure the best farming practices are being followed.
READ MORE ABOUT SHAKEOLOGY HERE

LET'S TALK EXERCISE!

This program follows a "food first approach" - meaning that you'll focus on the food first, shed some weight, then feel empowered to exercise. I know from personal experience that it's HARD to exercise when you have extra weight and feel disconnected from your body.

With the 2B Mindset approach, you are NOT required to exercise. Exercise is considered "extra credit," so you can do it, but you are not required to do it until you feel ready. And believe me, you will you will WANT to exercise when you have that positive relationship with food and love your body! Luckily, you will have access to our "Sweatflix" of workouts with thousands of different workouts to choose from at any time.
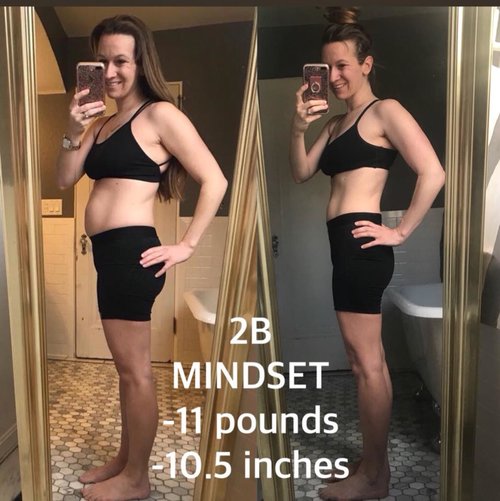
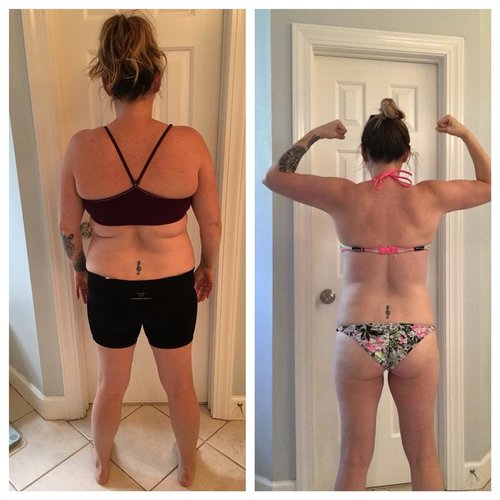
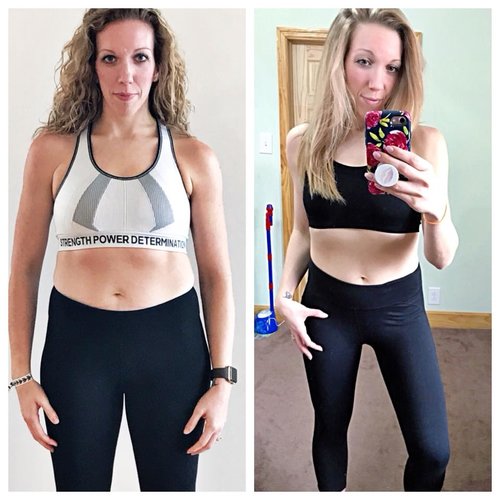
RESULTS

Check out these results (which were accomplished in 30-60 days with 2B Mindset)


ARE YOU READY TO CHANGE YOUR LIFE, BODY, AND RELATIONSHIP WITH FOOD? JOIN MY FOOD FREEDOM PROJECT!

I am going to be hosting a private accountability Fit Club, called The Nutritional Makeover, for my clients to help them navigate the 2B Mindset nutrition plan, to implement the strategies, and be there with them every single step of the process. If you are interested in locking arms with me and a group of women just like us, complete the form below and I'll be in touch!

SAVE YOUR SPOT IN THE NUTRITIONAL MAKEOVER!

Ready to win the weight loss battle once and for all? The 2B Mindset will help you lose weight happily – without depriving yourself, and without cutting out food groups, counting calories, or even having to exercise until you’re ready!

Let's lock arms and DO this! What do you say? Complete this form to save your spot and I'll be in touch!

0

Honey-Lemon-Mustard Chicken Thighs

This roasted chicken recipe showcases juicy, flavorful chicken thighs with a lemony sauce that bakes itself in the pan. Roasted chicken thighs are quick and easy, and the ideal weeknight dinner for busy families. I served them with creamy cauliflower risotto and sautéed spinach.

INGREDIENTS
8 bone-in, skin-on chicken thighs
1/2 cup olive oil
1 lemon juiced and zested
1 tablespoon grainy or dijon mustard
1 tablespoon of honey
salt and pepper
chopped parsley (optional)

INSTRUCTIONS
  1. In a bowl, toss chicken thighs with olive oil and lemon juice; season with salt and pepper and marinate 1 hour (or up to a day). 
  2. Preheat oven to 375 degrees. Roast chicken, skin side down, in an oiled roasting pan, 20 to 25 minutes; flip and roast 10 more minutes. 
  3. Stir together grainy mustard and honey and season with salt and pepper. Brush glaze onto chicken and broil 5 minutes.
  4. Sprinkle with chopped parsley.
Want more recipes like this, or support in your health and fitness journey in one of my Fit Clubs? Complete the form below and I'll send you info within 24 hours!
Fill out my online form.
There are tons of Wufoo features to help make your forms awesome.
0

Creamy Cauli-sotto (Cauliflower Risotto)

Cauliflower Risotto, 2B Mindset, tosca reno, autumn calabrese, Ilana Muhlstein, vanessa mclaughlin, vanessa.fitness, vanessadotfitness,, gluten free, keto
I love pasta, rice, bread, especially when pairing them with creamy, melted cheese! But, I'm on a new program that's easy to implement, and one of the principles is to make veggies the star, or the base of the meal. So, I've found delicious substitutes for these heavy carbohydrates, and in this recipe, used cauliflower rice in place of risotto rice. The addition of cheese wedges, gives it a zesty creaminess. I love serving this with any type of roast chicken.

INGREDIENTS
1 TBSP evoo
1 medium-sized shallot, minced
1 clove garlic, minced or grated
1 cup sliced baby portabello (cremini) mushrooms (optional)
1 (12-oz.) frozen cauliflower rice (approx. 4 cups) bag or fresh cauliflower rice
2 wedges spreadable cheese, broken into small pieces (.75-oz. ea.) like the kind from Laughing Cow
Chopped fresh chives (to taste; optional)
Salt and pepper to taste
INSTRUCTIONS
1. Place oil in skillet along with shallots, garlic, and mushrooms. Saute on medium heat until shallots are translucent (about 3 mins).
2.  Add cauliflower rice; saute until rice is thawed (if frozen) and tender (about 10-15 minutes).
3. Add cheese chunks and mix well, until cheese melts throughout.
4. Mix in salt and pepper to taste.
5. Sprinkle with chives; mix well.

**I served this with roasted chicken thighs. Want more recipes like this, or support in your health and fitness journey in one of my Fit Clubs? Complete the form below and I'll send you info within 24 hours!
Fill out my online form.
There are tons of Wufoo features to help make your forms awesome.
0

Easy Ground Beef Stir-Fry

Ground beef, dinner, stir fry, 21 Day Fix, Clean eating, whole 30, paleo, Autumn Calabrese, Tosca Reno, vanessa.fitness, vanessadotfitness, vanessa mclaughlin
Quick and easy. That's my motto during the week. Even when I plan and prep on Sundays, I still want fast weeknight meals. Kids activities, busy schedules, and a commitment to go to bed early, don't give me time to make complicated meals with lots of ingredients! I love this recipe not only because it's easy, but because my family thinks it's delicious!

INGREDIENTS
2 tablespoons ghee (or butter)
1 pound ground beef
2 cloves garlic, minced
1/2 yellow or white onion, sliced (I cook this separately because my husband doesn't like onions)
2-3 celery stalks, sliced
2 carrots, peeled and sliced (or 10 baby carrots cut in half)
1 small head broccoli, chopped (I buy pre chopped broccoli florets)
1/2 teaspoon minced ginger (use fresh or we love The Ginger People Brand)
1/3 cup low sodium soy sauce (use cononut aminos for Whole30 option)
juice of 1 lime
kosher salt, to taste
ground pepper, to taste
1/2 teaspoon crushed red pepper (optional)

INSTRUCTIONS
  1. Melt butter/ghee in large skillet or wok over medium heat. When hot, add garlic and onion. Cook for about 3 minutes.
  2. Add broccoli, carrots and celery. Stir.
  3. Add ground beef and a little salt. Brown the beef, breaking it apart with a wooden spoon, until cooked through. About 10 minutes.
  4. Drain your stir fry to get any excess liquid from beef.
  5. Return stir fry to skillet over medium heat. Add your minced ginger, soy sauce (or coconut aminos), juice of lime and crushed red pepper. Stir to mix all ingredients together. Cook until most of your liquid has soaked up, about 5-10 minutes.
NOTES
I love to serve mine over a bed of jasmine rice, quinoa or cauliflower rice!
0

Two Ingredient Bagels

bagels, everything bagels, trader joes seasoning, clean eating, tosca reno, autumn calabrese, 21 Day Fix, 80 Day Obsession
My sister texted me this recipe that she had found online. I wish I could give credit to the person who created this recipe, because it is AMAZING!

The basic recipe can be used for pizza dough, bread sticks, calzones etc. it’s a great basic dough. 

I decided to make some bagels with the dough, because I had several bottles of Everything But The Bagel seasoning from Trader Joe's (if you haven't tried this seasoning, it tastes exactly like an everything bagel, and I use it on everything too: eggs, chicken, veggies; it gives them all a zestiness)! 

I have included the recipe for JUST baking and skipping the boiling, as well as some tips and frequently asked questions! However, the bagels turn out much better if they are first boiled. 

They are delicious sliced to make a breakfast sandwich with egg and cheese, or just with a little butter. Enjoy!

Makes 2 bagels

INGREDIENTS
1/2 C fat free plain Greek yogurt
1/2 C self rising flour
Pinch of salt
1 egg, beaten for an egg wash
Everything seasoning

DIRECTIONS
1. In a large bowl, add yogurt first, followed by salt and self rising flour. Use a rubber spatula to mix together. It will be crumbly at first which is totally normal. Meanwhile bring a large pot of salted water to a boil and preheat over to 450 degrees.
2. Flour your hands and work surface and begin kneading. I knead my dough in the bowl because its less messy. Knead until you can easily form a ball, about 20-30 turns.
3. Cut the dough in half. Roll each section of dough into a long rope about 1/2-3/4″ in diameter. Pinch the two ends together to form a bagel shape (see below for tips).

Boiling Instructions (If you boil first, the bagels will be much larger and fluffier):

4. Carefully drop the bagels into the boiling water using a spatula so it doesn’t break apart. Allow to boil for about 30-60 seconds (the bagel will float to the top) then flip it over using the spatula and boil for another 30 seconds.
5. Remove bagels and transfer to a parchment lined cookie tray (I use Sil-Pat silicone baking mats). 6. Using a basting brush lightly spread the egg wash over the bagel then sprinkle with seasoning of choice.
7. Bake at 450 for 20 minutes (give or take) until golden brown. You may want to broil them to get them a little crispy or crank your oven up to about 550 for 1-2 minutes to brown them a little more.

Baking Instructions Without Boiling:

1. In a large bowl, add yogurt first, followed by salt and self rising flour. Use a rubber spatula to mix together. It will be crumbly at first which is totally normal. (See tips if your dough is too sticky or crumbly). Meanwhile preheat over to 450 degrees.
2. Flour your hands and work surface and begin kneading. I knead my dough in the bowl because its less messy. Knead until you can easily form a ball, about 20-30 turns.
3. Cut the dough in half. Roll each section of dough into a long rope about 1/2-3/4″ in diameter. Pinch the two ends together to form a bagel shape (see below for tips).
4. Transfer bagels to a parchment lined cookie tray (I use Sil-Pat silicone baking mats). Using a basting brush lightly spread the egg wash over the bagel then sprinkle with seasoning of choice. Bake at 450 for 20 minutes (give or take) until golden brown. You may want to broil them to get them a little crispy or crank your oven up to about 550 for 1-2 minutes to brown them a little more.

Egg and Cheese Bagel Sandwich
FAQ:
  • If you dough is too sticky add more flour to your hands and your work surface until it is more typical dough texture. Add about a teaspoon at a time and continue kneading until its less sticky.
  • If your dough is too crumbly add more yogurt, a tsp at a time continuing to knead until you reach typical dough texture.
  • If you don’t have self rising flour you can make your own using the following recipe: 1/2 cup all purpose flour, 3/4 tsp baking powder, 1/4 tsp of salt.
  • If your dough is not coming together to form a bagel shape, you may need to knead the dough at the ends together by folding it into itself. This way the dough can stick together. You want the ends to be as stuck together as possible before entering the boiling water. OR you can form a ball of dough, flatten it a bit with the heel of your hand and cut a hole in the middle!
  • If you don’t want to boil the bagels, please see the baking instructions above. They’re just as good, but not as airy and fluffy as typical bagels.
  • Why do I bake mine at 450 instead of 350? When recipe testing, I found the bagels did not bake through when I baked them at 350.
  • Why do I boil them? Traditional bagels are boiled and then baked. It makes them airier and fluffier. They’re just as tasty baked alone, but why not have a better tasting bagel bagel?
  • If you want to make more this recipe is easily doubled, tripled, or quadrupled.
  • If you want to store the bagels they last for up to 3 days in the fridge. I recommend storing them in an airtight ziplock bag.
  • If you want to freeze them, be sure to slice the first, then wrap them in foil or plastic wrap, then store them in an airtight freezer bag.
Olive Rosemary Bagels
TIPS:
  • Drain any extra liquid from the Greek yogurt or your dough will get too sticky!
  • Fage brand makes for the least tangy tasting bagels. Other brands you may find a more sour dough taste.
  • Make sure if you boil your bagels to have the water at a slow boil, not a rapid one or the bagels are more likely to come apart.
  • Like any bagel these are great toasted! Pop them in the toaster to reheat them and enjoy.
  • I've changed up my seasoning: add chopped olives and rosemary to make a savory roll-type bagel that I served with 40 Garlic Clove Chicken Soup.
  • Add a few tablespoons of honey to the yogurt, first, before combining with the flour, and first add cinnamon to the flour before combining with the honey-yogurt. This makes honey cinnamon bagels! 
Want more recipes like this, or support in your health and fitness journey in one of my Fit Clubs? Complete the form below and I'll send you info within 24 hours!
Fill out my online form.
Online contact and registration forms from Wufoo.
0

Zucchini- Sweet Potato Pancakes

pancakes, 21 day fix, 80 day obsession, autumn calabrese, tosca reno, clean eating
Pretty proud of these zucchini-sweet potato pancakes I made this morning!! So yummy! Can barely taste the zucchini, and so I know I'm getting in my veggies. Best of all, they fit right into my 80 day timed nutrition and fitness program!!

21 Day Fix container equivalent: 💚❤️💛and a tsp!!

INGREDIENTS

1 cup shred zucchini
2 eggs
1/2 cooked mashed sweet potato
1/2 tsp of cinnamon
1/4 tsp nutmeg
1 tsp almond butter

DIRECTIONS
1. Sauté shredded zucchini until water is out (or microwave it for 2 minutes and drain water)
2. Put cooked zucchini, eggs, and cooked, mashed sweet potato, cinnamon, and nutmeg in blender.
Blend until smooth.
3. Pour into skillet 2 or 3 pancakes at a time. Cook both sides.
4. Microwave 1 tsp almond butter and drizzle over pancakes

Want more recipes like this, or support in your health and fitness journey in one of my Fit Clubs? Complete the form below and I'll send you info within 24 hours!
Fill out my online form.
Online contact and registration forms from Wufoo.
0

Immune Boosting 40 Garlic Cloves Chicken Soup

chicken soup, garlic soup, immune booster, vanessa.fit, vanessa.fitness, vanessa mclaughlin, clean eating, autumn calabrese, tosca reno, 21 Day Fix
After traveling to NYC, taking a ton of public transportation, attending a fitness conference with thousands of people, teaching my students, working at the gym, mothering my kids, and the flu going around, I started to feel a bit run down. Before taking over-the-counter remedies, I like to try boosting my immune system naturally.

Garlic is a natural antibacterial and anti parasitic. It can also relieve stuffy noses, and it's an immune system booster. 

Try it! The chicken and garlic broth will warm you right up. The most surprising aspect you'll discover is the garlic cloves melt in your mouth. They also break down slightly in the soup to create what feels like a cream of garlic broth. There will be no such thing as leftovers with this recipe, so you may want to double or triple it (don't worry, your Instant Pot can handle it).

Read all the instructions of the Instant Pot before cooking with it! This recipe may not contain all of the specific safety instructions as they appear in the manual.

To make this gluten-free, sub flour with arrowroot starch.

INGREDIENTS
1 tablespoon unsalted butter
1 tablespoon extra-virgin olive oil
40 cloves of garlic (prepeeled to make life easy or 3 whole heads garlic, peeled)
1 pound frozen (about 2) boneless, skinless chicken breasts
1/4 cup white wine
2 sprigs of thyme or 2 TBSP
1 quart chicken broth
2 tablespoons all-purpose flour
Salt, to taste
Parsley leaves, to garnish

DIRECTIONS
  1. Plug in the Instant Pot and press the [Saute] button. When it beeps and "Hot" appears on the LED display, add butter, olive oil, and garlic, and cook, stirring occasionally for 5 minutes, or until garlic becomes completely caramelized. Add wine and continue cooking until it nearly evaporates. Add chicken, thyme, and broth. Close lid as manual instructs, making sure the pressure release handle is secured in the sealed position.
  2. Press [Manual] button and use the [+] or [-] buttons to choose 8 minutes of cook time. Once Instant Pot has finished the cook time, unplug Instant Pot. Use the "Quick Release" method of opening the cooker by carefully turning the pressure release handle to the "venting" position to let out steam until the float valve drops down. Carefully open the lid.
  3. Remove chicken breasts and place on a cutting board. Shred using two forks.
  4. In a small bowl, add about 1 cup of broth. Slowly whisk in flour to form a smooth slurry with no lumps. 
  5. Remove and discard thyme stems. Pour the slurry into the Instant Pot and stir to combine. Salt to taste (I used about 2 teaspoons).
  6. Spoon into bowls and garnish with parsley.
Interested in more recipes, nutrition and fitness motivation, one on one accountability or one of my Fit Clubs? Fill out my form below

Fill out my online form.
Online contact and registration forms from Wufoo.
0

Instant Pot Ground Beef Butternut Squash Stew


21 Day Fix, 21 Day Fix Extreme, Recipe, Tosca Reno, Autumn Calabrese, Vanessa.fitness, vanessadotfit, vanessa.fit, vanessa mclaughlin
   my Instant Pot!
It may be the best small, kitchen appliance I've ever bought, and it's definitely in my top 10 kitchen gadgets. I meal prepped my breakfasts and lunches this week, but I purposely didn't prep my dinners, because I have an Instant Pot.
However, I did PLAN my dinners. On the menu for tonight: Ground Beef Butternut Squash Stew.......and I started with frozen beef!!!
To be fair, I did buy pre-cut butternut squash, but everything else, I just made tonight. From start to finish, it took 40 minutes!
Sharing the recipe with you:

21 Day Fix container equivalents:
1 Red
1 Green
INGREDIENTS
1 tsp. olive oil
1 lb. raw, frozen, lean ground, beef
1 shallot minced as small as I could (because my husband doesn't like shallots)
1 red bell pepper, chopped
4 cloves garlic, chopped
1 can chopped tomatoes (low sodium)
1 cup low sodium, organic, beef broth
1 bay leaf
1 TBSP thyme
1 TBSP rosemary
1 tsp. sea salt or pink Himalayan salt
1 tsp. black pepper
2 cups cubed butternut squash
1⁄4 cup chopped flat leaf parsely
PREPARATION
1. Turn on Instant Pot "sauté" function and heat olive oil.
2. Add shallot and bell pepper; cook, stirring frequently, for 4 minutes until onions are translucent.
3. Add garlic; cook, stirring frequently, for 1 minute.
4. Add frozen beef, tomatoes, broth, squash, herbs, salt, and pepper.
5. Turn off sauté function.
6. Cover, turn QR valve to "sealing" and set to "pressure cook" for 25 minutes.
7. After 25 minutes, do a slow quick release, and let sit for about 5 minutes.
8. Uncover, remove bay leaf; serve topped with parsley.
9. If I had cauliflower rice, I would have topped it with the stew, but we ate it as is, with some sautéed spinach.. 
DELISH!!
Interested in more recipes, nutrition and fitness motivation, one on one accountability or one of my Fit Clubs? Fill out my form below

Fill out my online form.
Online contact and registration forms from Wufoo.
0